how to mold a mouthguard
Mouthguards are essential protective devices used in various sports and activities to prevent injuries to the teeth, gums, and jaws. Knowing how to mold a mouthguard properly ensures maximum comfort and protection. Whether you’re an athlete involved in contact sports or someone who grinds their teeth at night, understanding how to mold a mouthguard can make a significant difference in its effectiveness and your overall oral health. This guide will cover the types of mouthguards available, the materials they are made from, step-by-step instructions on how to mold a mouthguard, and tips for maintaining and caring for your mouthguard.
Types of Mouthguards
Before diving into the process of how to mold a mouthguard, it is essential to understand the different types of mouthguards available. Each type serves a specific purpose and has its own molding process.
Stock Mouthguards
Stock mouthguards are pre-formed and ready to wear. They are usually made from rubber or polyvinyl and come in standard sizes. While they are the least expensive option, they offer limited protection and comfort because they cannot be adjusted to fit your mouth precisely.
Boil-and-Bite Mouthguards
Boil-and-bite mouthguards are a popular choice for many athletes because they provide a customizable fit at a relatively low cost. These mouthguards are made from thermoplastic material that softens when heated in boiling water. Once softened, the mouthguard can be placed in the mouth and molded to the teeth and gums by biting down and applying pressure.
Custom-Fitted Mouthguards
Custom-fitted mouthguards are made by dental professionals using a mold of your teeth. They offer the best fit, comfort, and protection but are also the most expensive option. Custom-fitted mouthguards are ideal for individuals with specific dental needs or those involved in high-impact sports.
Materials Used in Mouthguards
Understanding the materials used in mouthguards can help you make an informed decision about which type is best for you and how to mold a mouthguard effectively.
Ethylene Vinyl Acetate (EVA)
EVA is a common material used in boil-and-bite and custom-fitted mouthguards. It is flexible, durable, and provides excellent shock absorption. EVA is also non-toxic and biocompatible, making it safe for prolonged use in the mouth.
Polyurethane
Polyurethane is used in some custom-fitted mouthguards due to its high impact resistance and durability. It offers superior protection but can be less flexible and comfortable compared to EVA.
Latex
Latex mouthguards are flexible and comfortable but are not suitable for individuals with latex allergies. They are often used in stock mouthguards and some boil-and-bite options.
How to Mold a Mouthguard: Step-by-Step Instructions
Molding a mouthguard correctly ensures that it fits snugly and provides optimal protection. Here are detailed instructions on how to mold a mouthguard, specifically focusing on boil-and-bite mouthguards, as they are the most common type that requires molding.
Step 1: Gather Your Supplies
Before you begin the process of how to mold a mouthguard, make sure you have the following supplies:
- A boil-and-bite mouthguard
- A pot of boiling water
- A bowl of cold water
- A timer or clock
- A spoon or tongs
- A mirror
Step 2: Boil the Water
Fill a pot with enough water to fully submerge the mouthguard and bring it to a rolling boil. The boiling water will soften the thermoplastic material, making it pliable for molding.
Step 3: Submerge the Mouthguard
Using a spoon or tongs, carefully place the mouthguard into the boiling water. Allow it to soften for the time specified by the manufacturer, usually between 30 seconds to 1 minute. Keep an eye on the mouthguard to ensure it does not overheat and lose its shape.
Step 4: Remove and Cool the Mouthguard
After the mouthguard has softened, use the spoon or tongs to remove it from the boiling water. Quickly dip it into the bowl of cold water for about 1-2 seconds to cool the surface without hardening the material. This step ensures that the mouthguard is not too hot when placed in your mouth.
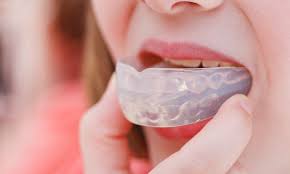
Step 5: Mold the Mouthguard
Place the mouthguard in your mouth, positioning it over your upper teeth. Using a mirror to guide you, bite down firmly and evenly on the mouthguard. Press the material against your teeth and gums with your fingers, starting from the front and working your way to the back. Suck in air and use your tongue to press the mouthguard against the roof of your mouth. This will help create a more secure and custom fit.
Step 6: Hold the Shape
Hold the mouthguard in place for about 30 seconds to 1 minute, allowing it to cool and harden in your mouth. Avoid removing it too soon, as this can disrupt the molding process. You want the mouthguard to set in the shape of your teeth for the best fit.
Step 7: Check the Fit
Remove the mouthguard and rinse it under cold water to fully harden the material. Place it back in your mouth to check the fit. The mouthguard should fit snugly and comfortably without causing any discomfort or excessive pressure. If the fit is not right, you may need to repeat the molding process, starting from Step 2.
Tips for Molding a Mouthguard
While learning how to mold a mouthguard, consider the following tips to ensure the best results:
- Follow Manufacturer Instructions: Always follow the specific instructions provided by the mouthguard manufacturer. Different brands and models may have slightly different requirements for molding.
- Use a Mirror: Using a mirror during the molding process can help you position the mouthguard accurately and ensure even pressure is applied.
- Avoid Overheating: Do not leave the mouthguard in boiling water for too long, as this can cause it to lose its shape and effectiveness.
- Trim Excess Material: If the mouthguard extends too far back into your mouth and causes gagging, you can trim the excess material with scissors. Be careful not to trim too much, as this can compromise the protection.
- Re-Mold if Necessary: If the fit is not perfect, you can re-mold the mouthguard by repeating the boiling and molding process. Most boil-and-bite mouthguards can be re-molded multiple times.
Caring for Your Mouthguard
Proper care and maintenance of your mouthguard are essential to ensure its longevity and effectiveness. Here are some tips on how to care for your mouthguard:
Cleaning
- Daily Cleaning: Rinse your mouthguard with cool water before and after each use. You can also use a toothbrush and non-abrasive toothpaste to gently clean it.
- Deep Cleaning: Once a week, soak your mouthguard in a denture cleaner or an antiseptic mouthwash to kill bacteria and remove any buildup. Avoid using hot water, as it can distort the shape of the mouthguard.
Storage
- Proper Storage: Store your mouthguard in a ventilated case when not in use. This allows it to dry completely and prevents the growth of bacteria and mold.
- Avoid Heat Exposure: Keep your mouthguard away from direct sunlight, hot water, and high temperatures, as these can cause the material to warp.
Regular Inspection
- Inspect for Damage: Regularly check your mouthguard for signs of wear and tear, such as cracks, tears, or deformation. If you notice any damage, replace the mouthguard to ensure optimal protection.
- Replace When Needed: Mouthguards can wear out over time, especially with regular use. Replace your mouthguard at least once a year, or sooner if it shows signs of significant wear.
Advanced Tips for Athletes
Athletes who use mouthguards frequently should take additional precautions to ensure their mouthguard remains effective and comfortable.
Custom-Fitted Mouthguards
For athletes involved in high-impact sports, investing in a custom-fitted mouthguard made by a dental professional is highly recommended. Custom-fitted mouthguards provide superior fit, comfort, and protection compared to stock or boil-and-bite options.
Double Layer Mouthguards
Double layer mouthguards offer enhanced protection by providing an additional layer of cushioning. These mouthguards are especially beneficial for contact sports where the risk of facial injuries is higher.
Hydration and Mouthguards
Staying hydrated is important for overall performance and can also affect the fit and comfort of your mouthguard. Dry mouth can cause the mouthguard to feel uncomfortable and may reduce its effectiveness. Drink plenty of water before and during athletic activities to keep your mouth moist and comfortable.
How to Mold a Mouthguard for Specific Needs
Different individuals may have specific needs when it comes to molding a mouthguard. Here are some additional tips on how to mold a mouthguard for various situations:
For Individuals with Braces
If you have braces, it’s important to choose a mouthguard designed to accommodate orthodontic appliances. These mouthguards are typically larger and can be molded to fit over the brackets and wires. Consult with your orthodontist to ensure you select the right type of mouthguard and follow their instructions on how to mold a mouthguard to fit properly.
For Children
Children’s mouths are constantly growing and changing, so they may need to mold a new mouthguard more frequently. Choose a boil-and-bite mouthguard specifically designed for children, and follow the same steps outlined above on how to mold a mouthguard. Make sure to regularly check the fit as their teeth and jaws develop.
For Nighttime Teeth Grinding
For those who grind their teeth at night (bruxism), a custom-fitted night guard made by a dentist is the best option. However, if you opt for a boil-and-bite mouthguard, follow the same steps on how to mold a mouthguard, but focus on creating a comfortable fit that won’t disrupt your sleep.
Common Mistakes to Avoid
When learning how to mold a mouthguard, it’s important to be aware of common mistakes that can affect the fit and effectiveness of the mouthguard.
Overheating the Mouthguard
Leaving the mouthguard in boiling water for too long can cause it to become too soft and lose its shape. Always follow the recommended heating time provided by the manufacturer.
Uneven Pressure
Applying uneven pressure when molding the mouthguard can result in an improper fit. Use your fingers and tongue to press the material evenly against your teeth and gums, ensuring a uniform shape.
Ignoring the Fit
A poorly fitting mouthguard can cause discomfort and provide inadequate protection. If the mouthguard feels too tight, too loose, or causes any pain, re-mold it or consider a different type of mouthguard.
Conclusion
Understanding how to mold a mouthguard correctly is crucial for ensuring optimal protection and comfort during sports and other activities. By following the step-by-step instructions and tips provided in this guide, you can mold a mouthguard that fits well and offers the best possible protection for your teeth and gums. Whether you’re an athlete, a parent, or someone who grinds their teeth at night, knowing how to mold a mouthguard is an essential skill for maintaining oral health and preventing injuries.
Investing time in learning how to mold a mouthguard properly can make a significant difference in its effectiveness. Remember to choose the right type of mouthguard for your needs, follow the manufacturer’s instructions, and take care of your mouthguard to ensure it lasts as long as possible. With the right mouthguard, you can confidently engage in your favorite activities while protecting your smile.
How Do You Mold a Mouthguard at Home?
Mouthguards are essential for protecting your teeth and gums during sports or other activities where there’s a risk of impact to the face. Fortunately, molding a mouthguard at home is a straightforward process if you follow these steps:
1. Choose the Right Mouthguard: There are three main types of mouthguards: stock, boil-and-bite, and custom-made. For home molding, you’ll be using a boil-and-bite mouthguard, which is designed to be softened in hot water and then shaped around your teeth.
2. Prepare Boiling Water: Fill a pot with enough water to fully submerge the mouthguard and bring it to a rolling boil. Once the water is boiling, remove it from the heat source to prevent the mouthguard from overheating, which can cause it to lose its shape.
3. Submerge the Mouthguard: Carefully place the mouthguard into the hot water using a pair of tongs or a slotted spoon. Let it sit in the water for about 30-60 seconds. The exact time can vary depending on the manufacturer’s instructions, so be sure to check the packaging.
4. Remove and Cool Slightly: After the allotted time, use the tongs to remove the mouthguard from the hot water. Shake off any excess water and allow it to cool for a few seconds. The mouthguard should be warm but not so hot that it will burn your mouth.
5. Mold the Mouthguard: Place the mouthguard in your mouth, positioning it over your upper teeth. Bite down firmly and use your fingers to press the mouthguard against your teeth and gums, ensuring a snug fit. Suck in air and press your tongue against the roof of your mouth to create a tight seal. Hold this position for about 30 seconds to a minute.
6. Cool the Mouthguard: After molding, remove the mouthguard from your mouth and place it in cold water for a few minutes to set the shape. Once it has cooled completely, try it on again to ensure a comfortable fit. If necessary, you can repeat the boiling and molding process to get a better fit.
7. Trim Excess Material: If the mouthguard is too long or has excess material, you can use scissors to trim it for a more comfortable fit. Be cautious not to cut too much, as you want to maintain adequate protection.
Tips for Success:
- Follow the manufacturer’s instructions closely, as specific products may have unique requirements.
- Practice patience and take your time to achieve the best fit.
- If you experience discomfort or difficulty breathing with the mouthguard, it may need to be remolded or replaced with a better-fitting option.
Molding a mouthguard at home is a cost-effective way to ensure you have the necessary protection during activities that pose a risk to your oral health. Properly fitted, a mouthguard can significantly reduce the likelihood of dental injuries.
Can All Mouth Guards Be Molded?
Mouthguards are an essential piece of protective equipment for athletes and individuals who grind their teeth at night. However, not all mouthguards are designed to be molded. Understanding the different types of mouthguards and their molding capabilities can help you choose the right one for your needs.
1. Stock Mouthguards: Stock mouthguards are pre-formed and ready to wear straight out of the package. They are typically made of a rigid material and come in standard sizes (small, medium, large). Due to their pre-formed nature, stock mouthguards cannot be molded to fit the unique shape of your teeth. They are often the least expensive option but offer the least customization and comfort. They may feel bulky and can make breathing and speaking difficult.
2. Boil-and-Bite Mouthguards: Boil-and-bite mouthguards are the most common type for athletes and individuals looking for a customizable fit at an affordable price. These mouthguards are made of a thermoplastic material that softens when heated in boiling water. Once softened, the mouthguard can be placed in the mouth and molded to the teeth and gums by biting down and using fingers and tongue to shape it. Boil-and-bite mouthguards offer a better fit than stock options, providing increased comfort and protection.
3. Custom-Made Mouthguards: Custom-made mouthguards are crafted specifically for an individual’s mouth by a dentist or dental lab. These mouthguards are made from an impression of your teeth, ensuring a precise fit. Custom-made mouthguards offer the highest level of comfort, protection, and durability. Because they are made to fit the exact contours of your mouth, they do not require additional molding. While they are the most expensive option, they are ideal for those who need a mouthguard for extended use, such as for night-time teeth grinding or high-contact sports.
Factors to Consider When Choosing a Mouthguard:
- Purpose: Determine whether you need a mouthguard for sports, teeth grinding, or another activity. This will help you decide between the different types available.
- Comfort: A well-fitting mouthguard should be comfortable to wear, allowing you to breathe and speak easily. Boil-and-bite and custom-made options generally offer better comfort than stock mouthguards.
- Protection: The primary function of a mouthguard is to protect your teeth, gums, and jaw. Ensure the mouthguard you choose provides adequate coverage and shock absorption for your specific activity.
- Cost: Budget can be a significant factor in your decision. While stock mouthguards are the most affordable, they may not provide the best fit or protection. Boil-and-bite mouthguards offer a good balance between cost and customization, while custom-made mouthguards provide the best fit and protection at a higher price point.
Conclusion: Not all mouthguards can be molded, with stock mouthguards being the exception. Boil-and-bite and custom-made mouthguards offer the ability to achieve a personalized fit, enhancing comfort and protection. When selecting a mouthguard, consider the specific requirements of your activity, your comfort preferences, and your budget to make the best choice for your oral health and safety.
How Long to Boil a Mouthguard to Sanitize?
Mouthguards are crucial for protecting teeth during sports and for those who grind their teeth at night. Keeping them clean and sanitized is vital to prevent bacteria buildup, which can lead to infections or bad breath. One common method to sanitize a mouthguard is boiling it. However, it’s essential to know the correct duration and process to avoid damaging the mouthguard.
1. Understanding the Material: Mouthguards are typically made from various types of thermoplastic materials, each with different heat tolerance levels. It’s crucial to follow the manufacturer’s guidelines for boiling, as excessive heat can deform or damage the mouthguard, rendering it ineffective.
2. General Boiling Guidelines: For most boil-and-bite mouthguards, the general recommendation is to boil for about 30 seconds to 1 minute. This duration is usually sufficient to soften the material for molding and sanitize it without causing damage. Custom-made mouthguards, which are often more durable, may also be sanitized in boiling water, but it’s best to consult with your dentist or the manufacturer for specific instructions.
3. Step-by-Step Boiling Process:
- Prepare the Equipment: You’ll need a pot, water, tongs or a slotted spoon, and a timer.
- Boil the Water: Fill the pot with enough water to fully submerge the mouthguard. Bring the water to a rolling boil.
- Submerge the Mouthguard: Using the tongs, carefully place the mouthguard in the boiling water. Set your timer for 30 seconds to 1 minute.
- Monitor the Process: Keep a close eye on the mouthguard while it’s in the water to ensure it doesn’t overheat. Overheating can cause the mouthguard to warp or lose its shape.
- Remove and Cool: After the allotted time, use the tongs to remove the mouthguard from the boiling water. Shake off any excess water and allow it to cool on a clean surface. You can also place it in cold water to speed up the cooling process.
4. Alternative Sanitizing Methods: If boiling seems too risky or is not recommended for your specific mouthguard, consider these alternative sanitizing methods:
- Mouthguard Cleaning Tablets: These are designed specifically for mouthguards and dentures. Dissolve a tablet in water and soak the mouthguard as per the instructions on the package.
- Hydrogen Peroxide: Soak the mouthguard in a solution of equal parts hydrogen peroxide and water for about 10 minutes, then rinse thoroughly.
- Vinegar Solution: Soak the mouthguard in a mixture of equal parts white vinegar and water for about 30 minutes. Rinse well afterward to remove any lingering taste.
- Antibacterial Soap: Use a mild antibacterial soap and a soft toothbrush to gently scrub the mouthguard. Rinse thoroughly with cool water.
5. Regular Cleaning Routine: In addition to periodic sanitizing, it’s essential to establish a regular cleaning routine for your mouthguard:
- Rinse the mouthguard with cool water before and after each use.
- Store it in a ventilated case to allow air circulation and prevent bacteria growth.
- Avoid exposing the mouthguard to high temperatures or direct sunlight, as this can cause it to warp.
- Replace the mouthguard if it shows signs of wear or damage, as a compromised mouthguard won’t provide adequate protection.
Conclusion: Boiling a mouthguard for 30 seconds to 1 minute is generally sufficient to sanitize it, but always refer to the manufacturer’s instructions to avoid damage. Regular cleaning and proper storage are essential to maintaining the mouthguard’s effectiveness and hygiene. By following these guidelines, you can ensure your mouthguard remains clean and provides optimal protection.
How to Form a Kids Mouth Guard?
Protecting a child’s teeth during sports or other activities where facial impact is possible is crucial. A well-fitted mouthguard is an essential piece of protective gear, and forming one properly ensures maximum comfort and protection. Here’s a comprehensive guide on how to form a kids’ mouthguard:
1. Choose the Right Mouthguard: There are several types of mouthguards available, including stock, boil-and-bite, and custom-made. For forming at home, boil-and-bite mouthguards are the best option as they can be softened in hot water and then molded to fit the child’s teeth.
2. Gather Necessary Supplies: You’ll need the mouthguard, a pot of water, tongs or a slotted spoon, a bowl of cold water, and a mirror. Having these items ready will streamline the process and ensure everything goes smoothly.
3. Boil the Water: Fill a pot with enough water to fully submerge the mouthguard and bring it to a rolling boil. Make sure the water is deep enough to cover the entire mouthguard.
4. Submerge the Mouthguard: Using the tongs or slotted spoon, carefully place the mouthguard into the boiling water. Allow it to sit in the hot water for the amount of time specified by the manufacturer, usually around 30-60 seconds. This softens the material, making it pliable for molding.
5. Cool the Mouthguard Slightly: After the specified time, remove the mouthguard from the boiling water with the tongs. Shake off any excess water and let it cool for a few seconds. It should be warm but not too hot to handle or place in the mouth.
6. Mold the Mouthguard: Quickly but carefully place the mouthguard in the child’s mouth. Ensure it covers all the upper teeth. Have the child bite down gently but firmly to imprint their teeth into the mouthguard. While the child bites down, use fingers to press the mouthguard against the teeth and gums. This helps create a snug and comfortable fit.
7. Suck and Press: Instruct the child to suck in air and press their tongue against the roof of their mouth. This creates a vacuum effect, ensuring the mouthguard fits tightly around the teeth. Hold this position for about 30 seconds to a minute.
8. Cool the Mouthguard: After molding, remove the mouthguard from the child’s mouth and place it in cold water for a few minutes to set the shape. Once it has cooled completely, try it on again to ensure a comfortable fit. If necessary, the boiling and molding process can be repeated to achieve a better fit.
9. Trim Excess Material: If the mouthguard is too long or has excess material causing discomfort, use scissors to trim it. Be careful to maintain adequate coverage for protection while ensuring it fits comfortably in the child’s mouth.
10. Regular Maintenance:
- Cleaning: Rinse the mouthguard with cool water before and after each use. Use a toothbrush and mild soap for a more thorough cleaning.
- Storage: Store the mouthguard in a ventilated case to allow it to dry and prevent bacteria growth.
- Inspection: Regularly inspect the mouthguard for signs of wear or damage. Replace it if it becomes torn or loses its shape.
Additional Tips:
- Ensure the child is relaxed and comfortable during the molding process.
- If the mouthguard causes significant discomfort or difficulty breathing, it may need to be remolded or replaced.
- For children with braces or other dental appliances, consult with a dentist for the best type of mouthguard and proper molding techniques.
Conclusion: Forming a kids’ mouthguard at home is a simple process that can provide significant protection for your child’s teeth during sports and other activities. By following these steps, you can ensure a comfortable and secure fit, giving your child the confidence to play safely. Regular maintenance and proper fitting will help prolong the mouthguard’s effectiveness, safeguarding your child’s dental health.
Why Won’t My Mouth Guard Mold?
Molding a mouthguard properly is crucial for ensuring it provides the necessary protection and comfort. If your mouthguard isn’t molding correctly, there are several potential reasons and solutions:
1. Incorrect Boiling Time: The most common reason a mouthguard won’t mold properly is boiling it for the wrong amount of time. If the mouthguard is not heated long enough, it won’t become pliable enough to mold to your teeth. Conversely, if it’s boiled too long, it can become too soft and lose its shape.
Solution: Follow the manufacturer’s instructions carefully. Typically, a boil-and-bite mouthguard needs to be submerged in boiling water for about 30-60 seconds. Using a timer can help ensure you don’t over or under-heat the mouthguard.
2. Water Temperature Issues: If the water is not hot enough, the mouthguard won’t soften properly. This can happen if you don’t bring the water to a full boil or if you let it cool too much before placing the mouthguard in it.
Solution: Make sure the water is at a rolling boil before you remove it from the heat. Immediately place the mouthguard in the hot water to ensure it softens adequately.
3. Improper Handling: Using tools that can damage the mouthguard, like metal tongs, or not handling it gently can cause it to lose shape. Also, not pressing it evenly against your teeth can lead to an improper fit.
Solution: Use plastic or silicone tongs to handle the mouthguard and be gentle during the molding process. Ensure you press the mouthguard evenly around your teeth and gums.
4. Mouthguard Quality: Some mouthguards are made from lower-quality materials that don’t mold well. If you’ve purchased a very cheap mouthguard, it might not soften and mold properly.
Solution: Invest in a high-quality boil-and-bite mouthguard from a reputable brand. These tend to have better molding properties and provide better protection.
5. Mouth Shape and Dental Work: Individuals with unique dental structures, such as braces, crowns, or bridges, may find it challenging to mold a standard boil-and-bite mouthguard properly.
Solution: Consider a custom-made mouthguard from your dentist. These are designed to fit your specific dental structure and provide the best fit and protection.
6. Re-Molding Issues: If you’ve attempted to mold the mouthguard multiple times, it may have lost its ability to reshape properly.
Solution: Limit the number of times you attempt to mold the mouthguard. If repeated attempts fail, it might be time to invest in a new one.
7. Environmental Factors: Environmental factors such as high humidity or extremely cold conditions can affect the mouthguard’s ability to mold properly.
Solution: Try molding the mouthguard in a controlled environment at room temperature to avoid such issues.
Conclusion: If your mouthguard won’t mold, it’s essential to consider the boiling time, water temperature, handling techniques, quality of the mouthguard, and any specific dental work. By following these guidelines and ensuring you use a high-quality product, you can achieve a better fit and optimal protection for your teeth.
Can I Boil My Night Guard?
Night guards are designed to protect your teeth from grinding (bruxism) and clenching during sleep. Maintaining and cleaning them is essential for hygiene and effectiveness. However, the method of cleaning, including boiling, depends on the material of the night guard.
1. Material Considerations: Night guards are typically made from one of the following materials: thermoplastic, hard acrylic, or a combination of both. The material dictates whether boiling is an appropriate method for cleaning.
- Thermoplastic Night Guards: These are similar to boil-and-bite sports mouthguards. They can usually be softened in hot water to mold to your teeth. However, once molded, boiling them again can damage their structure and fit.
- Hard Acrylic Night Guards: These are custom-made and highly durable. Boiling them is not recommended as it can warp the acrylic, making the night guard unusable.
2. Manufacturer’s Instructions: Always refer to the manufacturer’s instructions before boiling a night guard. Most manufacturers provide specific guidelines on cleaning and maintenance. Boiling is generally not recommended for cleaning most night guards due to the risk of damage.
3. Alternative Cleaning Methods:
- Mouthguard Cleaning Tablets: Dissolve a tablet in water and soak the night guard for the recommended time to sanitize it without boiling.
- Hydrogen Peroxide: Soak the night guard in a solution of equal parts hydrogen peroxide and water for about 10 minutes, then rinse thoroughly.
- Vinegar Solution: Soak the night guard in a mixture of equal parts white vinegar and water for about 30 minutes. Rinse well afterward to remove any lingering taste.
- Mild Soap and Water: Use a mild antibacterial soap and a soft toothbrush to gently scrub the night guard. Rinse thoroughly with cool water.
4. Regular Maintenance:
- Rinse the night guard with cool water before and after each use.
- Store it in a ventilated case to allow air circulation and prevent bacteria growth.
- Avoid exposing the night guard to high temperatures or direct sunlight, as this can cause it to warp.
5. Custom-Made Night Guards: For those using custom-made night guards, it’s crucial to avoid boiling as this can alter their precise fit. Instead, follow the cleaning recommendations provided by your dentist or the manufacturer. Custom night guards often come with specific cleaning instructions to maintain their shape and effectiveness.
6. Signs of Wear and Replacement: Regularly inspect your night guard for signs of wear, such as cracks, tears, or a change in fit. If the night guard becomes damaged, it’s essential to replace it to ensure continued protection for your teeth.
Conclusion: Boiling is generally not recommended for night guards, especially those made from hard acrylic or custom-made ones. Instead, use alternative cleaning methods such as mouthguard cleaning tablets, hydrogen peroxide solutions, vinegar solutions, or mild soap and water. Following these guidelines will help maintain the hygiene and effectiveness of your night guard, ensuring your teeth remain protected from grinding and clenching during sleep.
Is it OK to Mold a Mouthguard with Braces?
Wearing a mouthguard is essential for protecting your teeth during sports and other activities, especially if you have braces. However, molding a mouthguard for someone with braces requires special considerations to ensure both the mouthguard and the braces function effectively.
1. Importance of Mouthguards with Braces: Braces consist of brackets and wires that can cause additional injuries to the mouth if hit during sports. A well-fitted mouthguard not only protects the teeth but also shields the braces from damage, preventing costly repairs and prolonged treatment time.
2. Types of Mouthguards Suitable for Braces:
- Orthodontic Mouthguards: These are specifically designed for use with braces. They are made from a high-quality medical-grade silicone that adapts to changes in your teeth alignment, providing a comfortable fit without the need for constant remolding.
- Boil-and-Bite Mouthguards: While these can be molded at home, they require extra care when used with braces. Some brands offer boil-and-bite mouthguards specifically designed to accommodate braces.
3. Molding an Orthodontic Mouthguard: Orthodontic mouthguards typically don’t require boiling. They are made from flexible silicone that can adapt to the shape of your braces and teeth. Simply place the mouthguard over your teeth and bite down gently to secure it in place.
4. Molding a Boil-and-Bite Mouthguard: If using a boil-and-bite mouthguard designed for braces, follow these steps:
- Boil Water: Bring a pot of water to a rolling boil. Remove from heat and let it sit for a few seconds to slightly cool.
- Submerge the Mouthguard: Using tongs, place the mouthguard in the hot water for the time specified by the manufacturer, usually 30-60 seconds.
- Cool Slightly: Remove the mouthguard from the water and let it cool for a few seconds. It should be warm but not too hot to handle.
- Mold the Mouthguard: Place the mouthguard over your braces and teeth. Press down gently and use your fingers to shape it around your braces. Be cautious not to press too hard, which could damage the brackets or wires.
- Suck and Press: Suck in air and press your tongue against the roof of your mouth to create a vacuum effect, ensuring a snug fit.
- Cool to Set: Remove the mouthguard and place it in cold water to set the shape. Try it on again to ensure a comfortable fit.
5. Professional Fitting: For the best fit and protection, consider having a custom mouthguard made by your orthodontist. Custom mouthguards are designed to fit your unique dental structure and accommodate your braces, offering the highest level of comfort and protection.
6. Regular Adjustments: As your teeth shift during orthodontic treatment, your mouthguard may need adjustments. Check the fit regularly and consult your orthodontist if you notice any discomfort or changes in fit. They can help adjust or replace the mouthguard as needed.
7. Maintenance and Care:
- Cleaning: Rinse the mouthguard with cool water before and after each use. Use a toothbrush and mild soap for thorough cleaning.
- Storage: Store the mouthguard in a ventilated case to allow it to dry and prevent bacteria buildup.
- Inspection: Regularly inspect the mouthguard for signs of wear or damage. Replace it if it becomes torn or loses its shape.


